Making Reeds
From Cane to Blank
If you profile and shape the cane yourself, follow the steps below.
Selection of the cane:
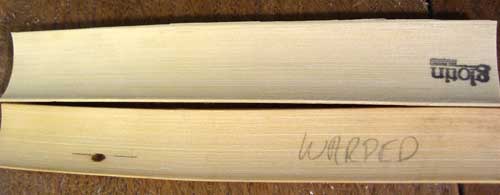
- Look down the bahn of the gouged piece to follow the grain. Choose cane that has grain that is as straight as possible. Discard any warped pieces.
- Lay the cane bark side up on a table. Discard any pieces that bow in the middle or rock quite a bit from corner to corner.
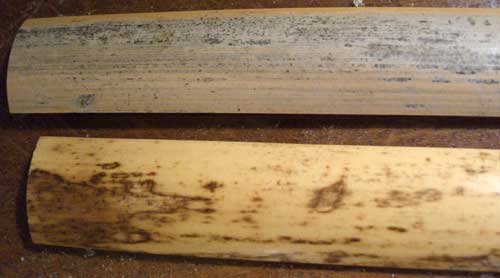
- Choose cane that is somewhat uniform in color. The bark should have a creamy, slightly yellowish color. Some mottled spots are fine. Discard pieces that have a lot of discoloration and gray spots.
- The gouge should be the color of a manila file folder. Cane that is slightly too yellow or green can be saved for another year or two. Cane that has a gray cast to it is too old and should be discarded.
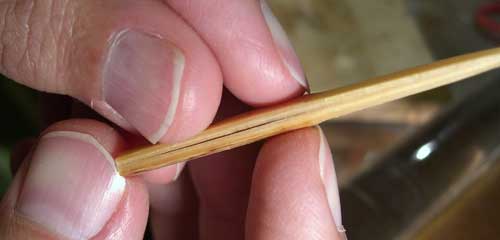
- I use a slightly elliptical gouge. Be sure the ends of each gouged piece have a slight crescent moon shape. If the crescent is not symmetrical, trim the thin side to restore symmetry. If the gouge is concentric, then regouge or sand the sides.
Cane hardness
Using a hardness gauge, select a batch of cane that is of a uniform hardness. I use cane that tests out from 14-16 in hardness. These numbers may not work for other hardness testers since they are not all calibrated the same way. Be sure to check both ends of the gouge, for they will often differ in hardness. Use the average of the two numbers to attain the hardness number. Cane that differs greatly from one end to the other is often of poor quality.
If you do not have access to a hardness gauge, you may evaluate the hardness of a piece of cane in a number of other ways.
- Drop the piece of cane on a hard surface and listen for the pitch. Higher pitch=harder cane, lower pitch=softer cane.
- Hold the cane between thumbs and forefingers and twist back and forth. Learn to feel for the “give of a particular piece of cane. More give=softer cane, less give=harder cane.
- Notice the way the cane feels under your tools. Cane that comes off the profiler in even, uniform strips is harder cane. That which comes off in torn, uneven thicknesses is softer.
- Cane that is thinner in gouge will tend to be harder than thickly gouged cane.
If you are stuck with a batch of cane that is consistently too soft you may gouge the cane a bit thinner up to .047”)to harden it or put it away for a few years and test it again. Cane that is consistently too hard often cannot be modified for use, but sometimes simply scraping the blade thinner throughout, especially in the channels can make it work.
Preparation of the gouge and soaking:
- Start with a gouge of about .050-.053” and a tube diameter of 24-26mm. The diameter can be checked by fitting the piece of cane on a dowel rod that is 1’ in diameter. The tube diameter has an effect upon the tip opening. Smaller diameter tends to yield reeds with a more arched tip, larger diameter, less arched.
- Sandpaper the gouge of the dry piece of cane with #400 wet/dry sandpaper. Wet the cane and let dry under a light. Repeat with #400 sandpaper, but do not re-wet. Finish with #600 sandpaper. Rub the gouge with the sandpaper backing.
- Soak cane for 24 hours in distilled water. Use a container with a tight lid and opaque surfaces so no light gets in. Alternatively, put the container in a dark place.
- Change water and soak for another 24 hours.
- Sand again while wet (optional).
Profiling (single barrel):
- Clamp profiler to table.
- Center cane on barrel both front to back and side to side.
- Place barrel on profiler making sure it goes all the way in the post slots and that there are no cane shavings in the slots.
- Bring cutting arm down on cane. Strip off bark starting in the middle of the width of the cane. Work from center to one side, then the other, slowly rotating the cane barrel. Use good pressure to begin the cut, then lighten up at the end of the stroke. Bring cutting arm up and back when finished with a cut to avoid dragging the blade backwards against the cane before each new stroke.
- Rotate the barrel and cut bark from other side.
- After the bark is removed use only the natural weight of your hand and the sharpness of the blade do the work (no downward pressure) and start removing cane below the bark. Work gradually removing a little at a time rotating the barrel after each pass. Remember to lift the cutting arm when bringing it back to the starting position to avoid dulling the blade. Check for cane shavings in the blade or in the posts in between passes.
- You are finished when you notice no more cane coming off.
Profiler troubleshooting:
- Blade seems to catch on cane. Oil the cutting arm bar with key oil.
- Barrel sticks in slots. Lift the barrel out of one of the slots, leaving the other end in. Rotate free end towards or away from you slightly so that amount of play around slot is equal in both directions. Do the same to the other slot end.
- Cutter cuts through cane. STOP PROFILING IMMEDIATELY. Check bolt on wheel for tightness. Check for cane shavings in slots. If all else fails, bring profiler to Mr. Stees
After profiling:
- Place cane on easel.
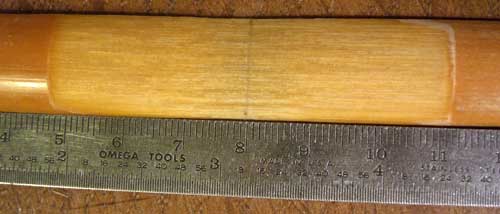
- Score cane at center point (about 60mm)by measuring halfway point between the two collars, marking with pencil and scoring lightly with carving knife.
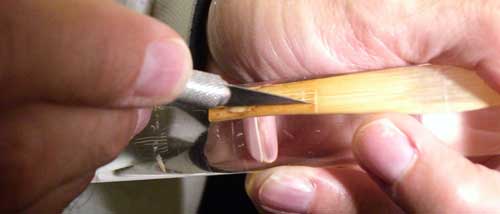
- Remove cane from easel and fold cane over knife blade.
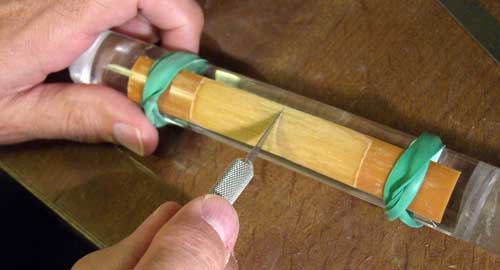
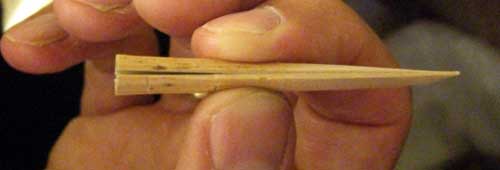
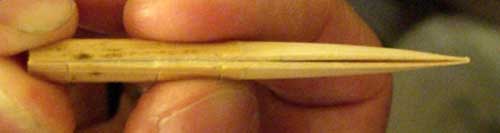
- Fit cane over shaper. It is extremely important that the cane be centered on the shaper. Sides should fit together with no overlap. Grain of cane should be parallel to length of shaper tip. Center thickness of cane should be placed precisely over midpoint of shaper width. Check centering under a light and clamp cane on shaper. Using carving knife, shape in a sawing motion. Rest shaper handle end on breast bone and hold knife with blade parallel to ground. Pinch fold with thumb and forefinger of left hand. Saw towards you, stopping about halfway down, reverse direction and cut back.
- Remember that the tip is thinnest in the middle (near where the second wire would go on the blank). Shaping in one direction only will result in a small tube opening and lots of unnecessary reaming. Do not sand the cane while it is on the shaper.
- Place cane on easel again.
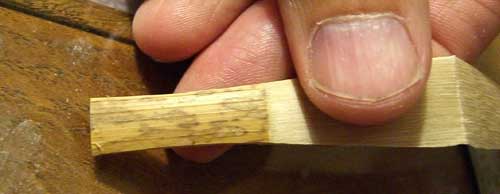
- Score bark with carving knife using five marks all starting at the collar and going all the way to the tube end
- Rotate cane on easel and repeat.
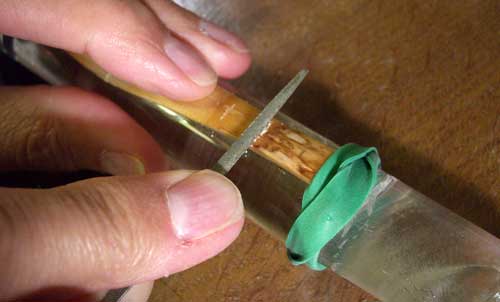
- Mark wire placements with a pencil and score bark with edge of file. Score collar positions as well.
- Fold cane over and carefully line up shaped sides with no overlap. Shoulders should line up. If shoulders do not line up, pinch fold and carefully slide tube end of longer side until shoulders line up. If shoulders do not line up, the profiled blades will not be symmetrical.
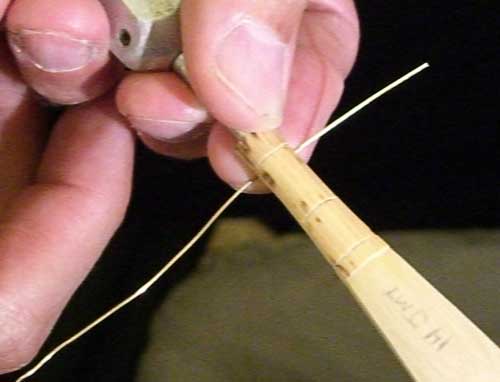
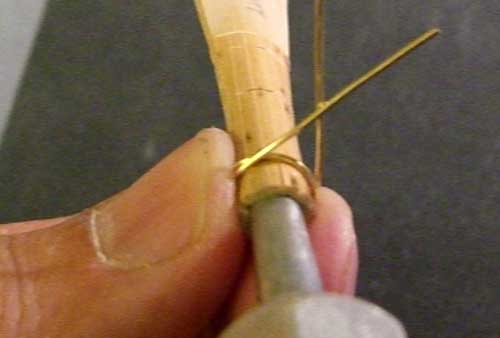
- Put first wire on by placing wire behind folded cane at first wire mark with 1/3 of wire on left, 2/3 on right. Wrap right side over left keeping right side on top at all times. Wrap around once and bring both wires together facing you to form small isosceles triangle at center point of cane width.
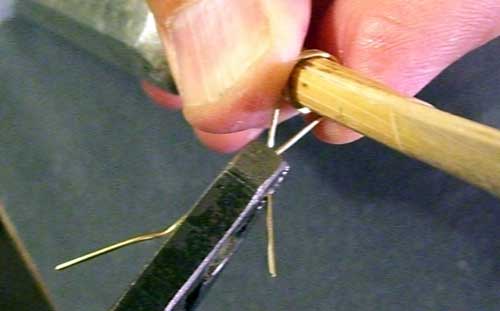
- Pull and twist wires in counterclockwise direction using needlenose pliers. Always pull first to take up slack in wire. Crimp wires together at base of cane occasionally to take up slack.
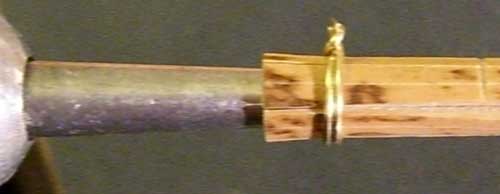
- Check measurement before last tightening. Inch mark should fall in between two wire wraps. Tighten until triangle disappears. Cut off excess wire. Be careful not to overtighten. Overtightening digs grooves into cane and chokes the sound.
- Cut a long rubber band open and wrap it on bark area starting at first wire. Wrap one end loosely at first then tightening aggressively at butt end. Wrap other end of rubber band in opposite direction from the first in the same manner. Tie off or hold in position near butt. If blank has dried off, soak in water for five minutes.
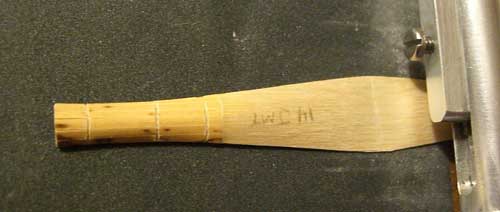
- Insert forming mandrel part way inside the tube until stable. Open first wire by squeezing it slightly on the sides with pliers. Continue insertion of forming mandrel until butt end contacts collar on forming mandrel tip. If you haven’t tied the rubber band ends together, do so now. Be careful not to twist blank or mandrel pin as you insert the pin.
- Remove forming mandrel from pin vise and place on drying rack.
- Let dry for at least two weeks. Longer drying time is even better.
- Remove rubber band, cut off first wire and open up blank.
- Tape a sheet of #320 sandpaper to the table.
- Sand the seams of the tube by laying the tube gouged-side down flat on the sandpaper and sand with 2 or 3 light strokes.
- Find the second wire mark you filed onto the bark. Place cane between thumb and fingers at the second wire mark, butt end of one side of the cane lying on the sandpaper. The rest of the cane should be hanging over the edge of the table. Sand from butt to second wire using fingers as a stop for the stroke. Use about 8-10 strokes, depending upon how much of a bevel you want.
- Repeat on other side of cane.
- To check bevel accuracy, fold cane over. Place fingers on the second wire mark. The amount sanded away should appear as a small sliver of light that begins at the butt and ends at the second wire mark. Sand again to correct any inconsistency.
- With fingers of one hand holding cane at second wire mark, fingers of another squeezing butt ends together, you should notice seams of blade open slightly.
- Put on third wire with holding mandrel inserted. Be sure that when wire is secured there is no opening at the seams of the cane around mandrel. Do not worry if tube does not fit as far on the mandrel as a finished, reamed reed would at this point. Third wire should be tightest of the three.
- Put on second wire with twist facing opposite from third wire. Should be securely tight, but need not be as tight as third wire.
- Put on first wire. Tighten so it is secure, but not constricting. This wire must be placed at exactly 1” from butt end – not a 64th more or less. The first wire should be moveable when cane is dry, snug and immobile when wet.
- Check all wire placements.
- Cut excess from twists, cutting third wire as close to tube as possible.
- Coat area from second wire to butt with glue and wrap. Apply two coats of glue to the wrapped area.
- After glue dries, soak reed for 3-5 minutes.
- Check first wire again. It should be exactly 1” from butt end.
- Mark tip on blade exactly 1-1/8” from first wire with a pencil.
- Cut tip with tip cutter or razor blade on cutting block. With razor blade, use both hands on blade and rock from left to right. Do not chop and do not use a dull blade. Most single edge blades are good for only 3-5 cuts.
- To finish reed, refer to REED FINISHING guide.
- More low in the sound: bevel more aggressively.
- Fuller low register: cut 2-5mm from tube end of shaped cane before forming tube. Make wire measurements the same minus the amount cut off.
- Deeper sound: (not for use with soft cane) put cane on shaper leaving 1/8” between shaper tip and cane fold.
- Sound more focused: Narrow flair of blade shape by slicing off sides of tip and filing with plaque as guide to put less flair in blade. Can also be done by rubbing on sandpaper before tip is cut off.
- Second bassoon reed (soft, low, down to pitch): Move first wire down from 1” mark the width of one wire. Also good if finished reed crows above an F.
The Camtasia Studio video content presented here requires JavaScript to be enabled and the latest version of the Macromedia Flash Player. If you are you using a browser with JavaScript disabled please enable it now. Otherwise, please update your version of the free Flash Player by downloading here.
If you buy gouged, shaped and profiled cane, start here after following the steps for preparing the gouge and soaking.
The Camtasia Studio video content presented here requires JavaScript to be enabled and the latest version of the Macromedia Flash Player. If you are you using a browser with JavaScript disabled please enable it now. Otherwise, please update your version of the free Flash Player by downloading here.
The Camtasia Studio video content presented here requires JavaScript to be enabled and the latest version of the Macromedia Flash Player. If you are you using a browser with JavaScript disabled please enable it now. Otherwise, please update your version of the free Flash Player by downloading here.

Modifications
The following are modifications to the Van Hoesen reed that I make for specific circumstances. Make these modifications only after you have mastered the finishing techniques I teach and are still not satisfied with the results or need a reed to do something particularly well.